|
| PSX Router -- Connecting |
|
|
Connecting to a PSX NetworkOne of the most attractive features of PSX is its network architecture. The simulator program is networked from the ground up, which enables it to perform several tricks that are a true blessing for cockpit builders.
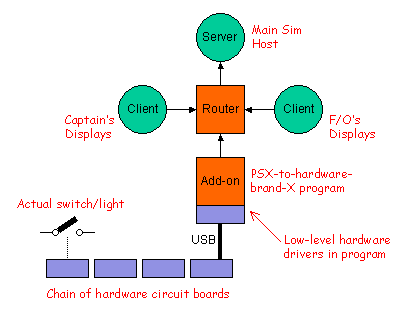
In the figure above, we see the position of a Router in a typical small flight deck network. As you can see, the Router calls the PSX Server, and several clients call the Router. These clients can be either PSX Clients, or additional programs that you can write yourself. There is very little difference between the PSX Server or the Router in terms of behaviour on the network. Please note that the only difference between a PSX Server and a PSX Client is the way in which it is started. All are exactly the same program, running multiple times. With a few tricks, a Router just by itself can behave very much like a PSX server. It is this "fake PSX" that we use here, as real PSX is not yet available.
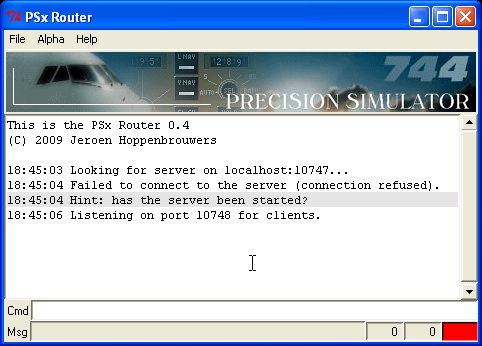
When you start the Router for the first time, you see something very close to the illustration above. You can see the Router looking for a PSX Server on the same machine as where the Router runs ("localhost") on port 10747. This is the default PSX port. If you feel unsure about the port concept, you may want to read up on TCP connections. You see that the connection failed (as there was no PSX server running) and the Router giving a hint what could have caused the failure. Then, the Router opens a port itself to listen for clients, meaning it is open for business. It is technically not possible to have two ports with the same number open on the same machine, so the Router listens on the alternate PSX port, 10748. You can configure both ports, of course. Because an essential element of Router operation is missing (the server), the status indicator at the bottom-right is red. It can also show amber and green, to indicate a temporary malfunction and correct operation. This status indicator is intended to allow you a very quick assessment of the system's health, which is useful if you build a flight deck. Left of the status indicator you see two figures, initially zero. These are the message counters for reception and transmission. They increase as soon as there is network flow, and wrap back to zero when they cross 9000. If you click on one, it resets to zero immediately. Handy for counting what your actions mean for the network. The last two elements of the PSX Router are the command line, where you can type commands, and the message line, where the Router displays messages that are not considered worth logging in the main white log window.
Making a ConnectionYou now need to get your application (add-on) to connect to the Router, on the machine the Router runs on, using port 10748. It depends on your programming language what method you use. Most programming languages allow the creation and handling of a TCP Socket; this usually is the term that allows you to find the right documentation.In case you want a quick try only, try the TELNET program that comes with most operating systems. Aim it at the Router, usually by something like:
Instantly you should see two things:
To break the connection, type
Suggested next page: PSX Network Protocol >> |
| © 2024 Jeroen Hoppenbrouwers | For more information, mail to hoppie@hoppie.nl |