 Take notice that the MCDU by itself does not do a lot. Unlike other
simulators, and exactly like the real 747-400, the MCDU is not a flight
management system. It is just a dumb terminal. Other avionics boxes in the
plane use it to have a single pilot interface in the cockpit. The FMS is
just one of those avionics boxes.
Take notice that the MCDU by itself does not do a lot. Unlike other
simulators, and exactly like the real 747-400, the MCDU is not a flight
management system. It is just a dumb terminal. Other avionics boxes in the
plane use it to have a single pilot interface in the cockpit. The FMS is
just one of those avionics boxes.This means that the MCDU just by itself has only the Config page available. All other modes must be installed by running another program alongside the MCDU on your network, such as ACARS, or the Engine Sound Generator.
It is very easy to write your own MCDU-enabled program, see the Programming chapter of the manual. I wrote a few modules myself already, and others did the same, but as far as I know they were all uniquely for PS1. This is not a limitation; the MCDU can and will listen to anybody who connects to it. If you want to write a module for MSFS, please do -- the MCDU welcomes you.
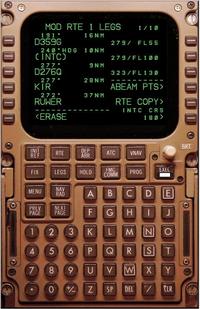
The photo on the right shows the MCDU when connected to the FMS of PS1.
The Configuration Page
There are a few things that you can ask the MCDU program to do, which are not a regular aviation option and specifically for the software implementation. You enter the Configuration Page via the main menu, which you can always access with the MENU key.- Reset
- This option "reboots" the MCDU, as if you cycled the power circuit breaker. It will lead to a complete resynchronisation of all MCDUs on the bus.
- Keyboard Next
- You can select PS1 keyboard layout and Magenta keyboard layout, plus disable the keyboard altogether.
- (Keyboard) Select
- actually activates the keyboard selected.
- Engravity port
- If you have an Engravity MCDU, fill in here the COM port number of the unit on your machine. Deleting it switches off Engravity support.
- MCDU Menu Layout
- Normally, all available modules are listed on the MCDU MENU page in alphabetical order. Often you do not want this, and have your own, preferred fixed position for the modules. This layout option lets you put any module on any key. Just add the name of the module (type it in the scratch pad) to your preferred key, or use standard downselect/upselect sequences to swap module positions. You can also DELete a module in the normal MCDU way. If a module is not available, its place remains reserved. Unreserved modules will fill in the gaps as before. If you really want to keep gaps open, just add non-existing modules (1, 2, 3...).
- Show Test Pages
- With this selection you can see a few test patterns, useful for aligning your display and other isolated technical things. With NextPage and PrevPage you can cycle through the patterns. While in test mode, mouse clicks on areas which are not "hot" (have no keypress associated) will display the X and Y coordinates of the click on the scratch pad. This is handy for setting up your own display configuration files.
- Broker IP
- Here you fill in the Broker's IP address, or "server" if you want the MCDU to listen out on port 1863 (0x747), or "off" if you are just toying around in stand-alone operation. You can postfix "/portnr" if you want to open a server on this port number, or connect to a Broker on this port number.
- Dspy Mode Next
- walks you through the available display modes.
- (mode) Select
- actually activates the mode selected.
- MCDU Program Exit
- In case you run the program full screen, this is the graceful way to end it. In photorealistic mode, you may have a standard [X] button on the decoration frame, which does the same.
- Computer Shutdown
- If you have a dedicated computer for the MCDU, such as with the PFC hardware, this is the official "off" button.
Adjusting display brightness
In the photorealistic modes, you can click just left or right of the BRT knob to decrease or increase the display brightness in ten steps. In all modes, the up and down arrows offer the same functionality.The PS1 FMC mode
You need a specific setup in order to get the PS1 CDU displayed on the MCDU. If you already run other PS1 add-ons, you likely already have all of these installed, as they are very common. If not, just take one step at a time. It is complex, but stable as soon as you get it all fitting together.
On the PS1 machine, you must install the IPC3
utility, and run IPC3 next to PS1 and the Broker. You can get all
of these from Ivan's
site. You must also make sure that the following lines are present in
the vmread.cfg file, otherwise the annunciators won't work and
the MCDU will not follow the Standby Power Switch:
11f6 1 A_INT 20 VM.MCDUEXELight

51ca 1 A_INT 20 VM.MCDUMsgLight

2ed2 1 A_INT 20 VM.MCDUOffsetLight

2934 1 A_INT 1  VM.StandByPower
These keys are included as usual in the VMREAD Wizard.
On another (non-PS1) computer somewhere on the network, you need to run Ivan's VMD (comes with IPC3) and activate the CDU display, with text export. You should fumble until you actually see PS1's CDU displayed on the other computer in the CDU window. If that works, and if the export-to-text is selected, and if your MCDU is online, it should display the FMC mode in the main menu. You may minimise VMD and the CDU display, but not close them. They are essential for the correct operation of the MCDU FMC mode.
When you select FMC mode, the MCDU sends two keystrokes to PS1 to make sure that the FMC is in a known state. From then on, you can do everything you could do on PS1 with the remote MCDU. The annunciators will follow PS1. There is some extra logic in the MCDU to control the DSPY annunciator, which PS1 itself does not support.
If you press MENU, the MCDU switches back to the MCDU main menu. This means that you cannot get at PS1's main menu. If you press MENU twice, you will get PS1's main menu instead, and can also access the CMC and SIMU pages.
Displaying PS1's CDU from the coarse VGA bitmap display via a network link and OCR back to the Broker and then to the MCDU is a robust, but complex process. Once in a while, a link in the chain might relay incorrect information. If this happens, and if you can reliably produce a discrepancy between the PS1 CDU and the MCDU in FMC mode, please let me know! I can correct most of the anomalies. Oh, but I cannot correct you leaving your PS1 mouse pointer on the PS1 CDU!
Parallel Operations
 The MCDU is designed to allow more than one MCDU in the system at the same
time. You can just start as many MCDUs as you want, on as many computers as
you need (more on one computer is no problem, as long as you realise that
you have only one mouse and keyboard per computer).
The MCDU is designed to allow more than one MCDU in the system at the same
time. You can just start as many MCDUs as you want, on as many computers as
you need (more on one computer is no problem, as long as you realise that
you have only one mouse and keyboard per computer).
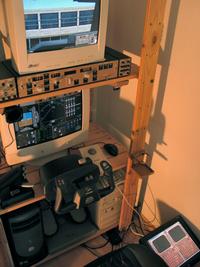
The photo on the right shows a setup with two photo-realistic MCDUs side to
side on one (touch) screen, placed where they logically belong from a
Captain's point of view.
Each MCDU will start up on the MENU page, and if you have more modules
available, each MCDU can control a different module. Typically this should
be two times FMC and one time ACARS, to imitate the real 744 setup with
three MCDUs. However, it is not possible to have two MCDUs independently
control the same module twice, unlike the real thing! If you switch two
MCDUs to the same mode, they will synchronise and stay in lock step. This
simplified the module programming enormously, and won't change.
So in brief: you can control each module with its own MCDU, but you cannot control the same module twice. If you want two FMC displays with independent control, you may want to use the Dual CDU setup. You can, however, copy the MCDU interface for the same module as many times as you want.
MCDU Keystroke Logging
For usability and human factor research at George Mason University, this feature can be enabled by adding the following line to theetc/mcdu.ini file (while the MCDU is not running):
mcdu.logging 1
When the MCDU logfile is enabled, all MCDU key strokes will be logged in the
etc/mcdu.log file. You may delete this file and start over at
any moment, even with the MCDU running.
The format of the log file is like this:
timestamp keyname {header text} {data text} {scratchpad text}
The timestamp is the time in milliseconds since the computer was booted, but usually you are only interested in the interval between keystrokes anyway.
The key name is the MCDU keystroke code, such as enumerated on the MCDU programming page. This is the key that was pushed at the millisecond timestamp.
The header field contains the content of the "line title" field that belongs to the Line Select Key pushed. For non-LSK key pushes, this field is blank.
The data field contains the content of the "line data" field that belongs to the Line Select Key pushed. For non-LSK key pushes, this field is blank.
The scratch pad field contains the content of the scratch pad line at the moment the key was pushed.
Note that the log file does not give a complete history of what the MCDU did. For example, if you upselect a value to a line, the result of that operation is not necessarily logged. Only subsequent key pushes are logged, from which the result may be deduced. However for typical usability research the log file is sufficient to reconstruct the dynamics of a session.
I am always open for enhancements to the MCDU if they facilitate or enable research.